Thursday, June 30, 2011

Day 4 Gymnastics Camp Crafts

Tie Dye Shirts! 


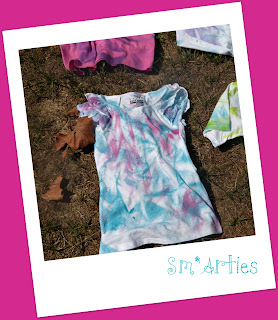
No, not real dye, SPRAY tie dye!  Did you think I was going to get involved in rinsing and wringing out almost 50 T-shirts again in 98 degree heat?  NO WAY!!!!


The purple and blue are our favorites.  Even with coupons for Hobby, Lobby, Joann's, and Michael's, this is a more expensive craft, so I tried to get by with just enough.  Just enough, however, is not enough.  Next time I will buy several extra cans and save the receipts in hopes of returning a few.  As it is, I will be getting some more cans and taking them to regular Gymnstics team practice, because we ran out of paint during the last group.  Learn from my mistake!


Our methodology is to lay the shirt on the ground/newspaper/cardboard, scrunch it around and spray color 1.  Then pull it open, scrunch in a different direction and sray with color 2.


If the shirt has a logo on it, spray it anyway!


Reserved for the boys:  camo set!


I loved it that quite a few children showed up the next day wearing their newly decorated shirts.




Wednesday, June 29, 2011

Day 3 Gymnastics Camp Crafts

Glass Refrigerator Magnets!


We made these same fridge magnets last year.  The campers who were there last year were excited to make magnets again.  This year I chose a couple of patriotic scrapbook papers.  This year, too, I found (well, our gymnastics coach found) the large flat-backed glass marbles at Dollar Tree.  They were a hit!

Tuesday, June 28, 2011

Day 2 Gymnastics Camp Crafts

Bugs on Rocks!


I painted bugs on rocks last spring with the Sm'Arties, and at the time filed away the idea for Gymnastics camp. 


To make the process flow quickly, all the rocks arrived with little faces - eyes and a mouth.  The perfectly round eyes come from a dab of white paint applied with a pencil eraser.  The black eyeballs are dots from the handle end of a skinny paintbrush.  I drew the little mouths, some happy, some squiggly.  Each child picked a rock and got to work.


I only brought about 3 regular and 2 skinny brushes so I could keep control of the groups. 

Our procedure:

- Line up.

- Pick your rock, write your name in Sharpie on the bottom.  Both names, please! - we have 3 Hannahs and 3 Graces.

-  Hold your rock, and get back in line.

- When it is your turn, paint the little half-circles for wings in a solid color. DON"T DECORATE IT YET! 

- Get back in line.  Hold your rock.

- When you get to the front of the line, your rock will be dry enough to paint some decorations - spots, stripes, etc.


- Leave your rock to dry.  Miss K-Sue will spray it with shiny spray later.

Monday, June 27, 2011

Day 1 Gymnastics Camp Crafts

Last year I got roped into volunteered to do crafts at Gymnastics camp.  Fun? Hot? Overwhelming? Exhausting? Heat exhaustion-type exhausting?  All of the above! 

So, of course, I did it again last week.


My campers ranged in age from 3 to 13 years.  There were over 45 campers, divided into 5 groups.  Group 4, the 12 boys, were a riot.  The challenge for me is to discover what kind of crafts are not unreasonable in expense, work in the timeframe, hopefully dry by 1 p.m., and can be made doable for preschoolers and highschoolers; boys and girls. 

For Day 1 (and Day 4!) I took a page from Earthgirl's 6th birthday party, a 70s shendig, and brought a spool of leather thong rope and a big container of pony beads.  Simplicity itself!


They were a hit with girls and boys. 


Friday, June 24, 2011

Shooting the photos - outtakes

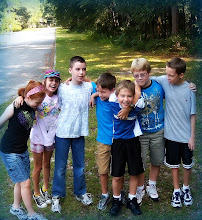
I had so much fun taking pics of the Sm'Arties , each holding my 50-cent frame, and then editting.  I love the fact that digital cameras allow me to take a bunch of pictures and save just my favorites, enhanced via picnik.com.  The outtakes from this day were fun, too.


Thursday, June 9, 2011

We are the Sm'Arties


Alienated Names

I am not sure where I first spied this fun lesson.  Maybe it came from Kinderart.  It's so much fun, and the students love the results so much that many art teachers have "alienated" their students :)


How to:  Fold paper in half length-wise.  Using the fold as the bottom line, write your name, your friend's name, or your Alias in GREAT BIG cursive letters in Sharpie or marker. Getting the writing BIG ENOUGH is the hardest part.

The original instructions I read suggested you not add any letter tails (g, y, etc.), but sometimes adding the opposing tails gives some cool results.

Trace the name so that it is mirror image to the first name. If the paper is thin enough and the writing dark enough, you can trace through, but if necessary, you can refold the paper the opposite way, trace name # 2 on the backside, then unfold and trace on the front.  Turn you paper upright and...ta-da!  An alien appears.

Trace him/her in Sharpie or dark marker, find his features, and embellish and color away!  Scare you friends!  Or make them laugh!


Spooky:  Here is another take on this lesson from Kid's Artists.

Squaring off

When I rediscover where I first saw this little project, I will insert a link - credit where credit is due!

Many folds!  We need 8 triangles showing.

Writing the words to fill up the space.  This means the middle letters are the largest letters in the word.


Write each word 8 times.  If you are brave, you can use Sharpies right from the start.

Almost done - smooth it out.
And color!  We like the Multicultural packs of markers, crayons and colored pencils - all those browns!


But frogs like bright colors :)

Illuminating

Hello, my name is Remiss.  I have not posted here for weeks.  Now I am trying to edit four sets of pictures and finish up posts from this school year - all by the end of this week.  Wowee....

The last few art lessons of the year all rotated around letters and names.  I had meant to do an ambitious lesson set on the Florida Highwaymen, but did not feel ready to do those artists justice, and kept pushing the lessons back...another...week.  Finally I conceded that the Highwaymen must wait for next year. 

We had fun illuminating letters though, alienating names, and putting words into boxes.


Most of the Sm'Arties have already studied the Middle Ages and seen examples of illuminated letters, but time has gone by, the students are older, their art skills are more developed, and it was a great time to look back a few centuries to the time when every book was a work of art.


I showed the Sm'Arties samples of illuminated letters, gave them squares of cream-colored cardstock, and let them create.


Their themes and interpretations surprised me!


When they were done, I mounted the squares on slightly larger squares of dark leathery-look scrapbook paper for a bit more of a finished look.